LiDAR drone scanning is a precise method for creating 3D maps of industrial sites. It combines drones with LiDAR sensors, GNSS, and IMU systems to collect highly accurate spatial data. This technology is widely used for inspections, site planning, and elevation modeling. However, achieving reliable results depends on proper preparation, flight execution, and data processing. Here's a quick guide:
- Pre-Flight Preparation: Assess site conditions, avoid adverse weather, and ensure GNSS base stations are set up within 6.2 miles of the site. Plan flight paths based on terrain and target structures.
- Equipment Setup: Securely mount and calibrate sensors. Perform static and kinematic alignments for accurate measurements.
- Flight Execution: Maintain stable flight patterns, monitor real-time data, and ensure complete area coverage using structured paths.
- Data Processing: Clean and organize point clouds, validate accuracy with control points, and use software to create 3D models or digital twins.
- Post-Flight Validation: Check for data integrity, confirm coverage, and archive results securely for future use.
Pre-Flight Preparation
Assessing Site Conditions
When you arrive at the site, start with a visual assessment of the area. Look for hazards that might not be visible on maps - things like powerlines, tall buildings, trees, or active construction zones. These obstacles can block GNSS signals or increase the risk of collisions during flight.
Weather plays a big role in data quality. Rain, fog, drizzle, or high winds can cause signal reflections, noise, and inconsistent drone paths. If the site has dust or debris from operations, it’s best to hold off on flying. These particles can add unwanted noise to your data.
Before heading out, use tools like Google Earth to check for topographic changes and review airspace restrictions with apps like Aloft or DJI Fly Safe. If the area has steep or uneven terrain, plan to fly at lower altitudes (150–300 feet) and increase overlap to 50–80% to ensure consistent data coverage.
"Avoid flying in adverse weather conditions such as rain or drizzle, as this can lead to poor point density and data gaps due to signal reflection."
– Wingtra Knowledge Base
Set up your GNSS base station no more than 6.2 miles from the flight area. Make sure it has a completely unobstructed view of the sky, and keep it away from powerlines or buildings that could block satellite signals. Also, verify that your takeoff zone is flat and has clear overhead space. This helps with proper GNSS antenna initialization.
These ground checks are crucial for planning a precise and efficient flight path.
Flight Path Planning
Design your flight path to match the type of area you’re mapping - use grid patterns for large areas and circular paths for vertical structures. This ensures complete and uninterrupted coverage.
To calculate line spacing, point density, and swath width, consider your flying height and speed. Tools like the TrueView Mission Planning Spreadsheet can help you get these settings just right. For standard terrain, aim for 30–50% overlap. For uneven or challenging terrain, increase overlap to 50–80% to account for elevation changes.
Incorporate specific maneuvers to fine-tune IMU and kinematic alignment. Techniques like box turns, figure-eights, or 5-second high-speed straight-line flights at the start and end of your mission can improve data quality. Don’t forget to include 30-second static calibration periods before takeoff and after landing to stabilize GNSS and IMU data.
Drone and Sensor Readiness
Once your flight plan is set, make sure your drone and sensors are ready to go.
Inspect the drone thoroughly before each flight. Check the propellers for damage and ensure that the LiDAR unit, lever arm, and GNSS antenna are securely attached. Loose components can cause data gaps or errors.
Double-check that all batteries are fully charged, spare batteries are on hand, and SD cards are formatted to prevent data loss.
Before you head to the site, update all firmware and software. This includes the drone firmware, mobile flight apps (like DJI Pilot or DroneDeploy), and mission control software. Also, make sure “Multiple Flight Mode” is enabled and “Beginner Mode” is turned off in your flight control app. This will prevent unnecessary restrictions during the mission.
Place the drone on a flat surface for about two minutes before takeoff. This allows the GNSS antenna to lock onto a strong satellite signal. After powering on, confirm that the LiDAR unit shows a solid green light (indicating a successful GNSS test) and listen for the camera's audible clicks to ensure it’s capturing images. If the GNSS signal isn’t tracking, try repowering the drone or moving to a spot with a clearer view of the sky.
How-To Fly Drone LiDAR | ROCK R3 Pro (Walkthrough)

Equipment Setup and Configuration

LiDAR Drone Flight Parameters by Industry Application
Once pre-flight preparations are complete, the next step is to set up and calibrate your equipment to ensure accurate data collection.
Mounting and Calibrating LiDAR Sensors
Begin by calibrating the drone's GNSS and IMU data. This involves both a static alignment (with the drone stationary) and a kinematic maneuver to fine-tune the system.
Choose the right LiDAR profile for your mission - whether it's an aerial configuration or a 30° ground-mounted setup. Double-check that the IMU-to-GNSS offsets fall within the acceptable range. Before takeoff, remove all protective covers and clean the sensor lenses thoroughly, as dirt or smudges can significantly reduce data quality. Place the drone on a flat, level surface and let it remain stationary for at least five minutes to allow the navigation system to initialize and the GNSS antenna to lock onto satellite signals.
Once in the air, perform a vertical takeoff, fly straight for five seconds at a speed of at least 16 ft/s (5 m/s), and then execute a Figure 8 pattern at a constant altitude. These movements help the system establish its heading and stabilize the Inertial Navigation System (INS).
"Always ensure your takeoff zone is free from obstruction, providing a clear view of the sky and minimizing risks."
– ROCK Robotic
After landing, keep the drone stationary for 30 seconds to complete the post-flight static alignment. Use the software interface to perform a formal "Shutdown." This step is crucial as it writes unit-specific parameters, such as boresight and camera alignment, to your project files. Skipping this step could result in having to manually reprocess the entire job.
Proper calibration ensures the system is ready for the next step: configuring flight parameters.
Flight Parameter Configuration
Setting precise flight parameters is critical for capturing high-quality data tailored to the mission's objectives.
Flight altitude directly affects point density and accuracy. For example, use 165 ft (50 m) for powerline inspections, 330 ft (100 m) for topographic mapping, and up to 500 ft (150 m) for forestry. Keep in mind that higher altitudes reduce the Probability of Detection (POD). At 200 ft (60 m), POD is 100%, but it drops to 86% at 400 ft (120 m) and 76% at 500 ft (150 m).
For multirotor drones like the DJI M300, stick to speeds between 16–33 ft/s (5–10 m/s). Fixed-wing drones can handle higher speeds, but avoid flying with strong tailwinds, as they can reduce point density and create data gaps. Flying perpendicular to the wind can help maintain consistent results.
LiDAR generally requires less overlap than photogrammetry. A side overlap of 30–50% works well for most terrain. However, increase it to 55–60% for dense vegetation, thin structures like powerlines, or assets with intricate contours.
Select the scan mode based on your target. Repetitive scan mode is ideal for high-accuracy surveying, while non-repetitive scan mode provides a broader vertical field of view, making it better for capturing complex structures and building facades. For echo modes, use dual-echo for higher point counts and triple-echo for penetrating dense canopies, such as in forestry or topographic surveys.
In hilly areas, enable terrain following to maintain a consistent height above ground. This ensures uniform point density and accuracy across elevation changes. Additionally, keep individual flight lines under 3 miles (4.8 km) to minimize IMU and GNSS drift. If longer flights are unavoidable, include loiter waypoints to stabilize the system.
| Industry/Application | Recommended Altitude | Recommended Speed | Side Overlap | Echo Mode |
|---|---|---|---|---|
| Topographic Mapping | 330 ft (100 m) | 33 ft/s (10 m/s) | 50% | Triple |
| Forestry | 330–500 ft (100–150 m) | 33 ft/s (10 m/s) | 50% | Triple |
| Powerline Inspection | 165 ft (50 m) above towers | 26 ft/s (8 m/s) | N/A (Linear) | Dual |
| City Modeling | 330 ft (100 m) | 33 ft/s (10 m/s) | 50% | Dual |
Source:
Flight Execution
Once your setup and calibration are in place, how you handle the drone during the flight plays a crucial role in determining the quality of your LiDAR data. Proper in-flight management ensures you collect accurate and reliable information.
Maintaining Stable Flight
Before taking off, check geomagnetic conditions to avoid navigation issues that could interfere with your flight path. Steer clear of bad weather - rain, fog, or strong winds can distort signals and compromise data quality.
To help stabilize the IMU data, perform box turns and align the drone’s heading during the flight. For areas with uneven terrain, fly at lower altitudes, ideally between 148 ft and 295 ft (45–90 m), and increase your overlap to 50–80%. This ensures consistent data density, even when dealing with elevation changes.
Always maintain visual line of sight (VLOS) to quickly respond to obstacles. After completing your main scan, slow the drone down to 10 ft/s (3 m/s) and conduct a final 30-second static data collection to wrap things up.
A stable flight is the foundation for accurate data collection and effective real-time monitoring.
Real-Time Monitoring
Real-time monitoring acts as your safety net, helping you catch any issues as they happen. Tools like Rock Pilot allow you to oversee data collection in real time, making it easier to identify anomalies and avoid costly repeat flights.
Pay close attention to physical status indicators on your equipment. A solid green LED signals that the system is ready to go, while a flashing green light shows active data logging. Audible camera clicks are another confirmation that data collection is progressing correctly. Keep an eye on your GNSS signal strength - if satellite connectivity drops, you’ll need to land the drone and reset it. In such cases, place the drone flat on the ground for two minutes to reacquire the GNSS signals.
Don’t forget to monitor your base station. It should remain powered and stable within a 6.2-mile (10 km) radius to prevent interruptions in data recording.
Maximizing Coverage
After ensuring flight stability and real-time oversight, focus on capturing complete coverage of your target area. Structured flight paths, such as grid patterns, concentric circles, or contour-following routes, help you avoid missing sections of the site.
Periodically review sample point clouds during the flight for quality control. Look out for signs like blurring, shadows, or coverage gaps - these indicate that adjustments to your flight path or settings might be needed. Also, be mindful of dust or debris from on-site activities, as these can interfere with LiDAR sensors and introduce unwanted noise into your data.
Before leaving the site, take a moment to perform a final check of your collected data. Confirm that your base station recorded continuously throughout the survey. This simple step can save you from discovering missing data when it’s too late to fix it.
sbb-itb-ac6e058
Data Processing and Analysis
Turning raw LiDAR scans into meaningful insights is a critical step. This phase ensures that all the effort put into data collection results in deliverables that meet stakeholders' needs.
Point Cloud Processing
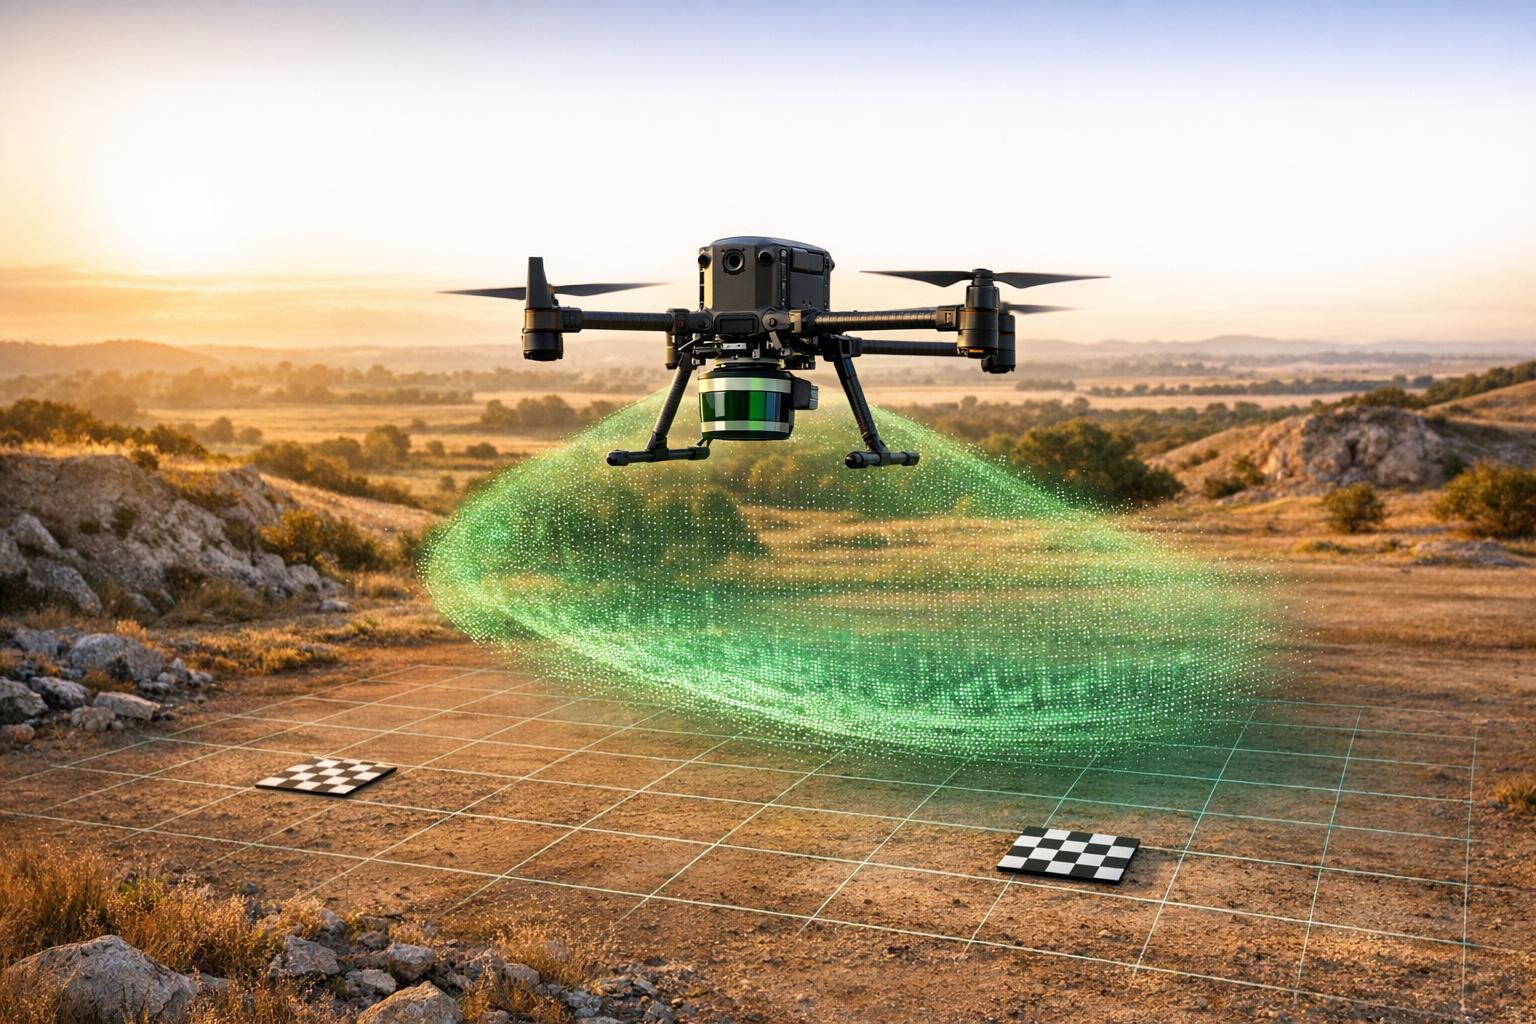
The first step is cleaning and organizing raw LiDAR data. Use reference targets like reflective spheres or checkerboard patterns to align the data and maintain spatial accuracy. It's essential to filter out noise, outliers, and any irrelevant background details that could compromise your final model.
After cleaning, extract essential geometric features - such as edges, corners, and surfaces - using software like Pix4D, Agisoft Metashape, or ArcGIS Pro. To ensure accuracy, compare the registered data with ground truth measurements to identify and correct any dimensional errors.
For the best results, base station data should be in RINEX 3.03 or later formats. Place checkpoints on solid surfaces with an open sky view, ensuring they are visible from all scanning positions.
Once the point cloud is cleaned and validated, you’re ready to move on to creating detailed 3D models and digital twins.
Creating 3D Models and Digital Twins
To build 3D models, process the cleaned point clouds using meshing or surface reconstruction techniques. The quality of these models depends heavily on accurate feature extraction and validation during the earlier stages. Maintaining 50–80% overlap during drone flights helps ensure high-quality models suitable for tasks like scan-to-BIM workflows.
For industrial uses, consider integrating LiDAR data with other sensor inputs, such as thermal imagery. This approach creates rich digital twins that can highlight issues like heat loss or moisture problems. Export models in formats like OBJ, STL, or PLY to ensure compatibility with CAD and BIM tools such as AutoCAD, Revit, and SolidWorks.
Once the models are ready, managing and analyzing the data effectively becomes the focus.
Using Anvil Labs for Data Management

Anvil Labs simplifies post-processing with a streamlined four-step workflow: capture, upload/process, inspect/add assets, and store/share. Its cloud-based platform can handle tasks like point cloud classification, elevation modeling for topographic data, and vectorization for structural analysis of buildings and bridges.
This platform delivers impressive efficiency. Users report detecting 30% more defects compared to manual inspections, and results are delivered 75% faster than traditional methods.
"My overall experience with the software has been satisfying because of the efficient workflow... The ROI is clearly marked within the first few uses." – Angel Rojas, Red Angel Drones
Most users see returns within just two months of adopting Anvil Labs.
Anvil Labs also offers secure hosting and sharing capabilities. Stakeholders can access 3D models, panoramas, and thermal imagery from a centralized platform. Its per-project pricing model ensures clear and predictable costs.
"The per project pricing makes it easy for me to bill customers. It's too arbitrary to predict the cost to customer with Agisoft or Pix4D's cloud costs." – Connor Barnes, Leading Edge Environmental and Emergency Services
Post-Flight Validation and Reporting
Once your data is processed, the final step is ensuring it meets quality standards and provides actionable insights for stakeholders.
Validating Data Accuracy
Start with immediate field checks: confirm the integrity of the MicroSD card, ensure the sensor cap was removed, verify full coverage of the target area, and check that the rover's storage isn't full while the reference station logged raw observations. Next, assess positional accuracy by comparing absolute and relative vertical measurements against surveyed ground control points. For precision, ensure intraswath measurements on flat surfaces and interswath consistency remain within acceptable limits (Δz ≤ 3.15 inches, with anything over 6.3 inches requiring rejection).
Capture photos of each checkpoint from the North, South, East, and West to document ground conditions and tripod setups. Survey point data should be reported with a precision level of 0.001. Additionally, review coverage continuity, point density, and image clarity to confirm the data's integrity.
Once these checks are complete, compile the findings into visual reports that clearly highlight data quality and key results.
Creating Reports with Visualizations
With validated data in hand, visualizations can turn technical details into practical insights for stakeholders. Include derived surfaces like Digital Terrain Models (DTM), Digital Surface Models (DSM), hillshade, and slope maps. Overlay thermal imagery on 3D models to pinpoint problem areas such as heat loss or moisture intrusion.
"Overlaying thermal images onto a 3D model can help identify areas of heat loss or moisture ingress more easily." – Anvil Labs
Generate normalized pulse density rasters by dividing pulse counts by cell area to confirm project specifications. Define the usable extent of your data with a "Soft Clip" polygon, keeping vertices to a minimum to avoid interpolation errors at the edges.
For quality control, load LAS datasets into 3D scenes to spot and reclassify noise or erroneous points before finalizing reports. Sharing these 3D visualizations through web-based platforms allows stakeholders to interact with the data without needing specialized software.
After creating detailed reports, securely archive the data to ensure long-term accessibility and compliance.
Secure Data Archiving
Store your processed data in a structured and organized format to monitor changes in asset conditions over time and meet regulatory requirements. Include documentation of the coordinate system (commonly NAD 83 and NAVD 88 for CONUS) and maintain full file statistics to support quality control.
Double-check sensor noise classifications, ensure zMin/zMax values are within acceptable ranges, and eliminate duplicate points by verifying the uniqueness of x, y, z coordinates and timestamps. Use the "withheld bit flag" in LAS files (version 1.4-R15) to mark outliers, sensor anomalies, or invalid surface returns.
Anvil Labs offers a cloud-based platform that simplifies secure archiving and sharing. It supports LiDAR point clouds alongside thermal imagery, 3D models, and orthomosaics, providing centralized access to all data types. With project hosting available for $49 per project, the costs are both predictable and easy to pass on to clients.
Conclusion
Achieving success with LiDAR drone scanning demands careful attention to every step of the process. From conducting thorough site assessments and planning flight paths to ensuring stable flights with real-time monitoring, every detail plays a role in the quality of the final results. By fine-tuning flight parameters and calibrating sensors properly, you can achieve vertical precision within ±2 inches when using PPK workflows and ground control points. This level of accuracy makes LiDAR an excellent choice for critical tasks like mining volumetrics, powerline inspections, and infrastructure monitoring.
Beyond its technical precision, LiDAR drone scanning offers unmatched efficiency and safety advantages. Drone-based inspections can be completed up to 75% faster than traditional methods, cutting costs by as much as 50% in difficult environments like bridges or unstable slopes. Plus, with precise point clouds and AI-driven analysis, these inspections identify up to 30% more defects. This blend of speed, safety, and precision delivers a strong return on investment, especially in industries where millimeter-level accuracy is essential.
Once the data is validated, centralized management tools turn raw point clouds into actionable insights. Anvil Labs simplifies this process by integrating LiDAR data with thermal imagery, 3D models, and orthomosaics in a secure cloud-based platform. Features like annotation tools, AI integrations, and cross-device accessibility make it easy for stakeholders to explore digital twins without needing specialized software. At $49 per project for hosting, the platform offers predictable pricing, making client billing straightforward while supporting long-term asset tracking and regulatory compliance.
FAQs
What steps should I follow to collect accurate data with a LiDAR drone?
To collect precise data using a LiDAR-equipped drone, begin with careful flight planning. This step ensures the area is thoroughly covered and the data captured meets the quality needed for your project. It's also crucial to select equipment that matches the specific requirements of your task and the conditions you'll be working in.
Using ground control points (GCPs) is another key step. These help improve georeferencing accuracy, providing more dependable results. Make it a habit to routinely check and calibrate both the drone and the LiDAR sensor to keep them performing at their best. Additionally, keep an eye on environmental factors like weather and lighting, as they can significantly impact the quality of the data collected during flights.
How does weather impact the accuracy of LiDAR drone scanning?
Weather plays a crucial role in the accuracy and reliability of LiDAR drone scanning. Conditions like rain, fog, and snow can scatter the laser pulses, introducing noise into the data and reducing its precision. For example, water droplets from rain or fog can disrupt the laser's ability to distinguish between the ground and airborne particles, complicating the post-processing phase. On top of that, water accumulating on the sensor can further impair the system's performance.
Strong winds and poor visibility add another layer of difficulty. High winds can destabilize the drone, while fog or mist can obstruct the pilot's clear visual line of sight (VLOS) - both of which are essential for safe and efficient data collection. To achieve the best results, plan surveys around weather conditions and prioritize clear, calm days whenever possible.
What advantages do LiDAR drones have over traditional inspection methods?
LiDAR drones offer a safer, quicker, and more budget-friendly way to handle industrial inspections. Traditional methods often involve lane closures, scaffolding, or rope access, all of which can be disruptive and time-consuming. In contrast, drones gather detailed structural data from above with minimal interference.
With the ability to create precise 3D maps and analyze even the most challenging-to-reach areas, this technology reduces risks for workers and speeds up the entire process. By simplifying inspections, LiDAR drones enhance productivity without compromising accuracy.
