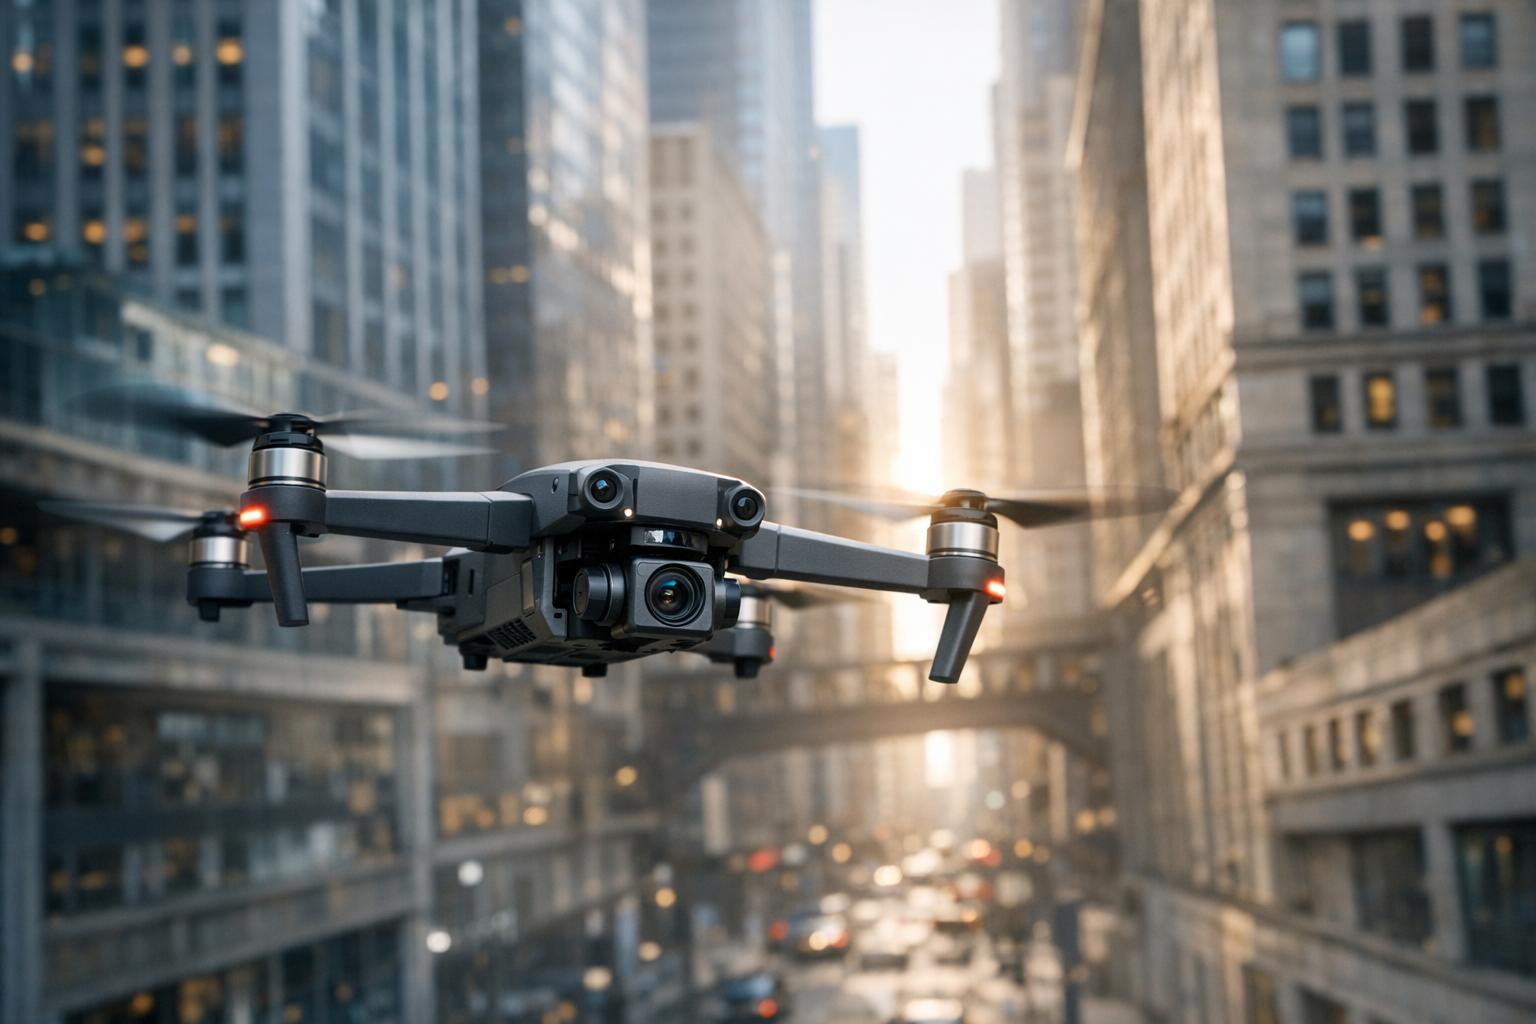
Flying drones in challenging areas like industrial sites or dense terrains requires precision and preparation. Mistakes can lead to costly damages or legal penalties. To ensure safe and efficient drone operations, follow these key practices:
- Pre-Mission Planning: Check weather (wind speeds, Kp Index, GNSS satellites), review airspace rules (LAANC, NOTAMs), assess hazards (power lines, bird activity), and plan flight routes with backups.
- Hardware Setup: Use multi-sensor systems (LiDAR, thermal cameras), ensure compatibility of flight controllers, check battery health, and secure payloads.
- Software Configuration: Enable real-time obstacle avoidance systems, calibrate navigation models, and integrate sensor data for accurate mapping.
- In-Flight Monitoring: Monitor environmental conditions, adjust flight paths dynamically, and stay alert for safety threats like manned aircraft or signal interference.
- Post-Mission Review: Analyze flight logs, process data for insights, and refine future missions based on findings.
These steps reduce risks, ensure FAA compliance, and improve data quality, making your drone operations safer and more reliable.
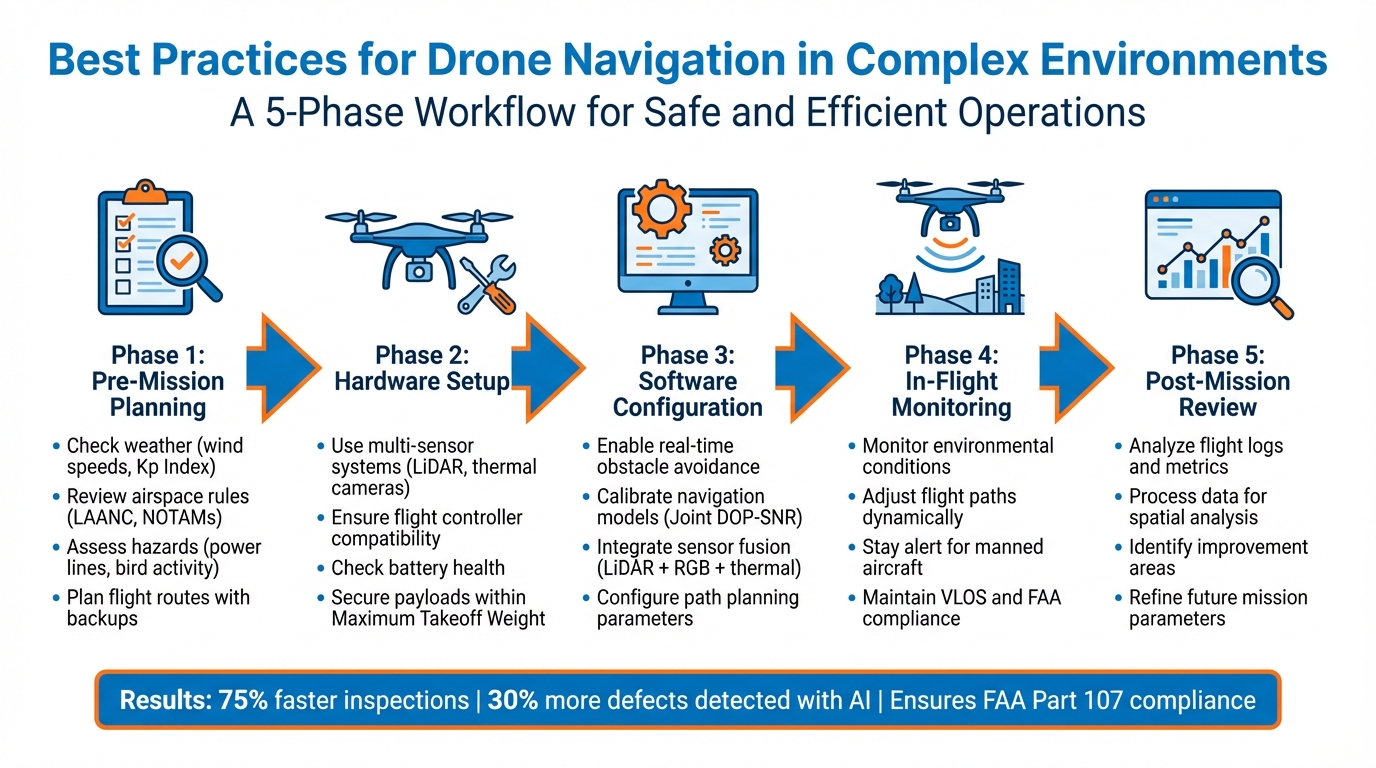
5-Phase Drone Navigation Workflow for Complex Environments
SU17 Research Drone Real-World Obstacle Avoidance Test | Navigation in Stone Array and Dense Forest
Pre-Mission Planning Checklist
Before launching your drone, it's crucial to have a well-structured plan in place. Ignoring key steps like checking weather, understanding regulations, or identifying hazards can lead to equipment damage, legal issues, or even mission failure. Use the checklist below to ensure every critical pre-flight detail is addressed and documented.
Assess Environmental Conditions
Start by evaluating local weather conditions. Pay close attention to wind speeds at different altitudes (e.g., 100 ft and 400 ft), temperature, visibility, precipitation chances, and cloud height. If you're using LiDAR, avoid flying in rain, drizzle, fog, or mist, as these conditions can reduce data quality and create gaps in point density.
Check the Kp Index, which measures geomagnetic activity. High solar activity can interfere with GPS signals and disrupt positioning. If the Kp Index exceeds 4, delay your mission. Additionally, confirm that enough GNSS satellites are available for accurate navigation, and allow the GNSS antenna at least two minutes of clear-sky exposure before takeoff.
Be aware of bird hazards, especially in areas with nesting or hunting raptors like hawks or eagles. These birds can attack drones, causing damage to propellers. Review emergency procedures and consider noise-sensitive or protected areas that may restrict your operations.
Review Airspace Regulations
Determine whether your flight will occur in controlled airspace (Classes B, C, D, or surface Class E) or uncontrolled airspace (Class G). Controlled airspace flights require prior authorization from Air Traffic Control. For quick approvals at over 600 airports, use LAANC (Low Altitude Authorization and Notification Capability). If your flight requires altitudes above UAS Facility Map limits or involves non-LAANC airports, submit a request through FAA DroneZone well in advance.
Always check NOTAMs (Notices to Airmen) and Temporary Flight Restrictions (TFRs) for updates on airspace status or restricted zones. Ensure your flight path avoids prohibited areas. If you're flying near airports in uncontrolled airspace, monitor the Common Traffic Advisory Frequency (CTAF) to stay informed about nearby manned aircraft.
| Airspace Access Method | Best For | Lead Time |
|---|---|---|
| LAANC | Quick approval for flights below UASFM altitudes | Same day |
| LAANC (Further Coordination) | Approval for higher altitudes (up to 400 ft) | At least 72 hours in advance |
| FAA DroneZone | Complex waivers or non-LAANC airports | At least 60 days in advance |
Conduct Hazard Assessments
Identify potential physical obstacles like power lines, buildings, and dense vegetation that could interfere with your flight. Consider risks at ground level, including people and property. In areas like urban canyons or forests, GPS accuracy can drop significantly - from about 5 meters to over 50 meters - so plan for possible signal degradation.
Use tools like the B4UFLY app to check for restricted conservation areas and confirm airspace safety. Brief your team on their roles, emergency protocols, and contingency plans. Before takeoff, inspect your drone’s systems, including control links, battery levels, and payload security, to ensure everything is functioning properly.
Plan Flight Routes
Map out both primary and backup flight routes. Account for terrain changes by planning altitude adjustments and setting clear emergency abort procedures. Keep your altitude under 400 ft AGL or within 400 ft above a structure's peak, and limit your groundspeed to below 100 mph.
Avoid extended low-altitude flights in noise-sensitive areas. For night operations, make sure your drone is equipped with anti-collision lights visible from 3 statute miles. Document all flight parameters, and have your remote pilot certificate and drone registration ready for inspections if needed.
Hardware and Sensor Selection Checklist
Selecting the right hardware and sensors is a critical step in ensuring your drone can safely and effectively navigate complex environments. Your equipment should function as a cohesive system, not just as a collection of separate components. With thorough pre-flight planning in place, choosing integrated hardware and sensor systems becomes essential for precise navigation and avoiding obstacles.
Use Multi-Sensor Systems
Outfitting your drone with essential sensors like a gyroscope, accelerometer, magnetometer, barometer, and rangefinders is key to accurately estimating orientation, heading, and altitude. These sensors also enable terrain following and obstacle avoidance. For high-precision mapping, especially in areas with dense vegetation, LiDAR systems like the Teledyne Geospatial EchoONE or DJI's Zenmuse L2 are excellent options.
Thermal cameras layered onto 3D models can help detect issues like heat loss or moisture infiltration. In environments where GPS signals are unreliable - like indoor spaces or urban canyons - optical flow sensors, which pair a downward-facing camera with a distance sensor, allow for position locking and velocity estimation.
Confirm Flight Controller Compatibility
Make sure your flight controller is compatible with your drone and sensor setup. It should support AI-driven obstacle avoidance and inertial navigation, and its firmware must be up to date. Compatibility with transmission systems is also crucial: for example, DJI O4 systems require specific controllers like the RC-N2 or RC 2, while older O2/O3 systems work with the RC-N1. Additionally, ensure that external modules like GNSS, RTK positioning systems, and airspeed sensors are compatible with your controller's ports and firmware.
For outdoor operations in bright sunlight, choose controllers with high-brightness displays. Screens with at least 700–1,000 nits are recommended. For extreme brightness, the DJI RC Pro 2 offers a 7-inch Mini-LED screen with up to 2,000 nits, making it a solid choice for daylight conditions.
Check Battery and Payload Readiness
Before every flight, inspect your battery's health and always use manufacturer-approved batteries and chargers. Keep your sensor payload within the drone's Maximum Takeoff Weight to ensure stability and prevent equipment failure. Be mindful of UAV-specific vibration patterns, which can interfere with sensors. For operations in windy or coastal areas, drones weighing over 3.3 lb offer better stability and performance.
"The task of mounting such a sophisticated payload to a new UAV is not one that should be taken lightly." - AEVEX Geodetics
To minimize downtime in demanding environments, carry spare batteries, propellers, and backup sensors.
Review Site Data Using Anvil Labs

Before heading out, review existing site data to confirm that your hardware and sensors are up to the task. Anvil Labs provides tools for analyzing 3D models, LiDAR point clouds, and orthomosaics from prior missions or surveys. By uploading and examining thermal imagery overlaid on 3D models, you can identify structural problems or environmental challenges.
The platform works across devices, making it easy for your team to assess site conditions and ensure your sensor setup aligns with the terrain's demands. Pre-analyzing data like LiDAR scans and 360° panoramas can highlight areas with dense vegetation, steep slopes, or potential GPS dead zones. In such cases, additional navigation aids, like optical flow sensors, may be necessary. This preparation helps you arrive on-site ready to tackle the mission, reducing the need for return trips or last-minute adjustments.
Software and AI Configuration Checklist
Once your hardware is set, the next step is configuring your software and AI systems to prepare your drone for real-time obstacle avoidance. These configurations determine how efficiently your drone processes sensor data and responds to potential hazards.
Enable Real-Time Path Planning
Activating path planning allows your drone to navigate obstacles autonomously, without requiring manual input. If you're using PX4-based systems, set the COM_OBS_AVOID parameter to 1 to enable the Path Planning Offboard Interface. This interface facilitates obstacle avoidance, safe landings, and upcoming spatial awareness capabilities.
You’ll need to choose between a local planner and a global planner:
- The local planner operates at about 30Hz and supports flight speeds up to 3 m/s, making it ideal for navigating tight spaces in real time.
- The global planner runs at a slower 10Hz and limits speeds to 1 to 1.5 m/s, but it’s better suited for mission-wide navigation.
For challenging environments, the local planner is often the better choice.
Real-time path planning requires a companion computer running computer vision software, typically through ROS nodes. This computer maps the environment and sends trajectory updates to the flight controller. To ensure safety, configure your system to switch to "Hold mode" if the flight controller doesn’t receive setpoint updates for more than 0.5 seconds. Additionally, adjust waypoint acceptance logic to rely on an acceptance radius rather than a specific heading. This gives the avoidance algorithm full control over the drone’s orientation, ensuring obstacles remain in the sensor’s field of view.
Once these settings are in place, it’s time to fine-tune your navigation models for greater accuracy.
Calibrate Navigation Models
Proper calibration is essential for your AI navigation models to accurately predict localization uncertainty and adapt to environmental conditions. Start by applying a Joint DOP-SNR (Dilution of Precision and Signal-to-Noise Ratio) formulation. This method evaluates how anchor geometry and signal quality influence positioning accuracy. With a 0.976 correlation coefficient to actual localization error, this metric is highly reliable for assessing navigation performance.
To establish a baseline, measure range and angle-of-arrival errors at a distance of 1 meter. Use RF modeling to extend these baseline margins across various distances, poses, and rotations within your drone’s operational range. This process creates an RF-navigation map, which identifies the optimal drone pose and the best sensor combinations for reliable localization at any point in space.
For instance, MIT’s MiNav system demonstrated a median 3D error of 9.1 cm and increased navigation reliability by 20% in featureless environments.
With calibration complete, the next step is to integrate multiple sensor streams for a comprehensive view of the environment.
Integrate Sensor Fusion
Sensor fusion combines data from sources like LiDAR, RGB cameras, and thermal sensors to create detailed 3D models and improve obstacle detection. The flight stack communicates with external path planning services by receiving SET_POSITION_TARGET_LOCAL_NED messages from avoidance software.
A practical example of sensor fusion comes from the U.S. Geological Survey (USGS). In August and October 2023, their Fort Collins Science Center used a multirotor UAS to collect data along Montana’s Vermilion River. By integrating low-altitude LiDAR, natural color (RGB), and thermal infrared imagery with Real Time Kinematic (RTK) GPS data, they created high-resolution elevation models and surface temperature maps.
To improve data quality for environmental modeling, calibrate spectral sensors using methods like the Empirical Line Method or radiometric calibration. Since GPS signal issues can arise in complex environments, it’s wise to back up GPS data with additional sensors for consistent navigation. Even with advanced automation, operators should have a contingency plan to regain visual contact or manually guide the drone if spatial awareness is compromised.
sbb-itb-ac6e058
In-Flight Monitoring and Adjustment Checklist
Once in the air, keeping a close eye on conditions and being ready to adapt swiftly is crucial for safe drone operation. Here's how to stay on top of things during a flight.
Keep an Eye on Environmental Factors
Industrial drones are built to handle tough conditions, like winds up to 40 mph (18 m/s) and temperatures ranging from –4°F (–20°C) to 86°F (30°C). But pushing beyond these limits can mess with landing precision and drain the battery faster than expected. Pay attention to GNSS signal quality, especially in areas where signals might struggle, like near tall buildings or dense forests. High DOP (Dilution of Precision) values are a red flag for poor positioning. If you're flying near high-voltage equipment, ensure your drone's localization stays accurate within 2 inches (5 cm).
"The remote pilot or recreational flyer is responsible for the safe operation of their unmanned aircraft... [and] must ensure they are knowledgeable of the flight to be performed to include operational parameters, UAS limitations, local weather, and applicable flight rules."
– Federal Aviation Administration (FAA)
Stay alert for manned aircraft flying below 400 ft AGL and for raptors, which could damage your drone's propellers. If you're near an airport, monitor the Common Traffic Advisory Frequency (CTAF) to stay aware of nearby air traffic.
This constant vigilance ensures you're ready to make quick adjustments when unexpected obstacles arise.
Be Ready for Dynamic Course Changes
When conditions shift, adapt your flight path immediately. Use scan-to-model matching to compare updated LiDAR data with your local map, enabling your drone to navigate around obstacles in real time. To counteract point cloud distortions, incorporate vehicle velocity into ICP (Iterative Closest Point) loops. For instance, algorithms like those used in the MOLA framework are excellent for managing these distortions. Robust kernels in navigation algorithms help filter out outliers, keeping your drone on a steady course - especially in tricky environments. Always set clear thresholds for operational weather conditions and have a backup navigation plan in case of GPS signal issues or interference.
Leverage Real-Time Data with Anvil Labs
Platforms like Anvil Labs are game-changers for real-time data review. They provide tools for analyzing thermal imagery, 360° panoramas, and 3D models. Anvil Labs can auto-correct camera tilt and distortion, ensuring accurate volume measurements and detailed 3D models. Keep communication with your team clear and consistent. If you notice problems like image blurring or shadows, adjust your altitude or overlap settings right away. Also, remember that if property damage exceeds $500 during a Part 107 operation, you must report it to the FAA. And for night operations, your drone needs anti-collision lights visible from at least 3 statute miles.
Post-Mission Review Checklist
Once your drone mission wraps up, it’s time to dive into the details and make the most of your data. A thorough post-mission review ensures every flight delivers valuable insights and sets the stage for future improvements.
Analyze Flight Logs
Start by examining your flight logs. Look at key metrics like total flight time, battery usage, data coverage (including overlap, resolution, and point cloud density), and the number of Ground Control Points (GCPs) to confirm spatial accuracy. Don’t forget to document environmental factors - wind speed, temperature, and other conditions that might have influenced the flight. It’s also crucial to verify that you adhered to Visual Line of Sight (VLOS) requirements and stayed within FAA regulations throughout your operation.
"The ROI is clearly marked within the first few uses." – Angel Rojas, Red Angel Drones
Modern drone and AI platforms are changing the game, offering inspections that are 75% faster than traditional methods. Plus, AI-driven analysis can detect 30% more defects compared to manual inspections. After the flight, review sample images or point clouds right away to catch any shadows or gaps in coverage that might need attention. Once you’ve confirmed the data meets your standards, you’re ready for the next step: digital processing.
Upload Data for Spatial Analysis
Take your raw data - LiDAR scans, orthomosaics, and 3D models - and process it into digital twins to unlock deeper insights. Platforms like Anvil Labs allow you to integrate thermal imagery and panoramic data, offering detailed spatial analysis at a per-project cost of $49. Overlaying thermal images onto 3D models can highlight critical issues such as moisture ingress or heat loss. These insights can guide adjustments to sensor configurations or flight plans for future missions. Make sure to archive all data systematically. This not only helps track changes in asset conditions over time but also supports regulatory compliance.
Identify Improvement Areas
With your spatial data in hand, compare your planned flight routes to the actual paths flown. This can help you identify any discrepancies. Use spatial analysis tools to uncover patterns, anomalies, or trends that might not have been obvious during the flight. Evaluate whether your altitude, speed, and overlap settings achieved the desired resolution. For instance, flying at lower altitudes can yield sharper details but may also increase flight time. Document these findings to refine your approach. This ongoing feedback process is what elevates drone operations from good to exceptional.
Conclusion
Thorough preparation and disciplined execution are the backbone of successful drone operations. They minimize risks, ensure compliance with FAA Part 107 regulations, and help avoid costly penalties. Smart planning sets professionals apart by ensuring your data is accurate and usable right from the start, eliminating wasted airtime and the need for repeat missions.
"The drone itself isn't magic. The real results? They come from prep work." – Dronefly
Every mission benefits from precise planning. The checklists shared here - from pre-mission preparation to post-flight analysis - offer a solid framework for turning raw aerial data into actionable insights. Key practices like maintaining Visual Line of Sight (VLOS), establishing clear communication among team members, and having backup equipment ready ensure operations remain safe and efficient.
Advanced tools, such as Anvil Labs, take this preparation further by streamlining data processing and spatial analysis. These platforms deliver impressive results, with inspections running 75% faster than traditional methods and AI-driven analysis identifying 30% more defects than manual reviews. Features like centralized data sharing and historical tracking keep engineers, asset managers, and drone operators aligned throughout the project lifecycle.
"Effective communication between the drone operator, data analyst, and other team members is crucial for a safe and successful inspection." – Anvil Labs
From planning to post-flight reviews, each checklist plays a critical role in reinforcing the operational framework outlined in this article. Together, they provide a strong foundation for maximizing flight efficiency while ensuring compliance, safety, and scalability.
FAQs
What should I consider when planning a drone mission in challenging environments?
When preparing for a drone mission in a challenging environment, the first step is to clearly outline your goals and the type of data you need. Whether you're focusing on capturing structural details or performing precise measurements, having a clear objective will guide your choice of equipment, sensors, and flight settings.
Conduct a thorough site assessment to pinpoint potential hazards like power lines, trees, or tight spaces. Use this information to identify safe take-off and landing zones, ensuring the mission runs smoothly.
Regulatory compliance is another key factor. Make sure you meet all Part 107 requirements and secure any necessary waivers or airspace authorizations. Once that's handled, select a drone that fits your mission's needs and configure it with the right settings, such as altitude and speed, to ensure accurate data collection.
To refine your plan further, consider integrating site data into a spatial platform like Anvil Labs. This allows you to review the environment in detail, annotate potential hazards, and validate your flight plan. Lastly, a comprehensive pre-flight checklist is essential. Double-check your equipment, weather conditions, and pilot readiness to ensure the mission is both safe and efficient.
How does sensor fusion enhance drone navigation and obstacle detection?
Sensor fusion brings together data from various sources - such as LiDAR, cameras, radar, ultrasonic sensors, and IMUs - to build a highly detailed, real-time 3D representation of the environment. This method enhances navigation precision, reduces drift, and provides more dependable obstacle detection and classification.
With these combined inputs, drones gain a clearer understanding of their surroundings, allowing them to adjust to shifting conditions and safely maneuver through complex environments. This remains true even in tough situations, like navigating in low visibility or through cluttered areas.
What are the key steps for analyzing drone data after a mission?
To thoroughly analyze drone data after a mission, the first step is to safely transfer all raw files - including images, LiDAR point clouds, and thermal data - into a reliable storage system. Combining cloud backups with local storage is a smart way to keep your data secure while ensuring it's readily accessible for processing. Before moving forward, verify the integrity of your files using checksum or hash validation to avoid any surprises later.
Once the data is secure, the next step is to organize and enhance it with metadata. Add details like the flight date (e.g., January 4, 2026), GPS coordinates, sensor settings, and any field annotations. Sticking to standardized naming conventions and using a centralized catalog can make teamwork smoother and retrieval faster down the line. From there, process the data using tools like photogrammetry or point-cloud software to generate outputs such as orthomosaics, 3D models, or elevation maps. For the best results, ensure proper image overlap - about 75% front overlap and 60% side overlap - and validate accuracy with ground control points.
Finally, make sure both raw and processed data are stored securely. Use encryption and access controls to protect sensitive information. Platforms like Anvil Labs offer features to share results, annotate models, and extract critical measurements (e.g., distances in feet or meters), making it easier for teams to collaborate and make informed decisions.
