60% of drone incidents are caused by equipment failures, and 30% stem from human error. These issues are largely preventable with a proper pre-flight checklist. Whether you're a hobbyist or a professional operator, pre-flight checks are critical for ensuring safety, avoiding costly repairs, and complying with FAA regulations.
Here’s what you need to know:
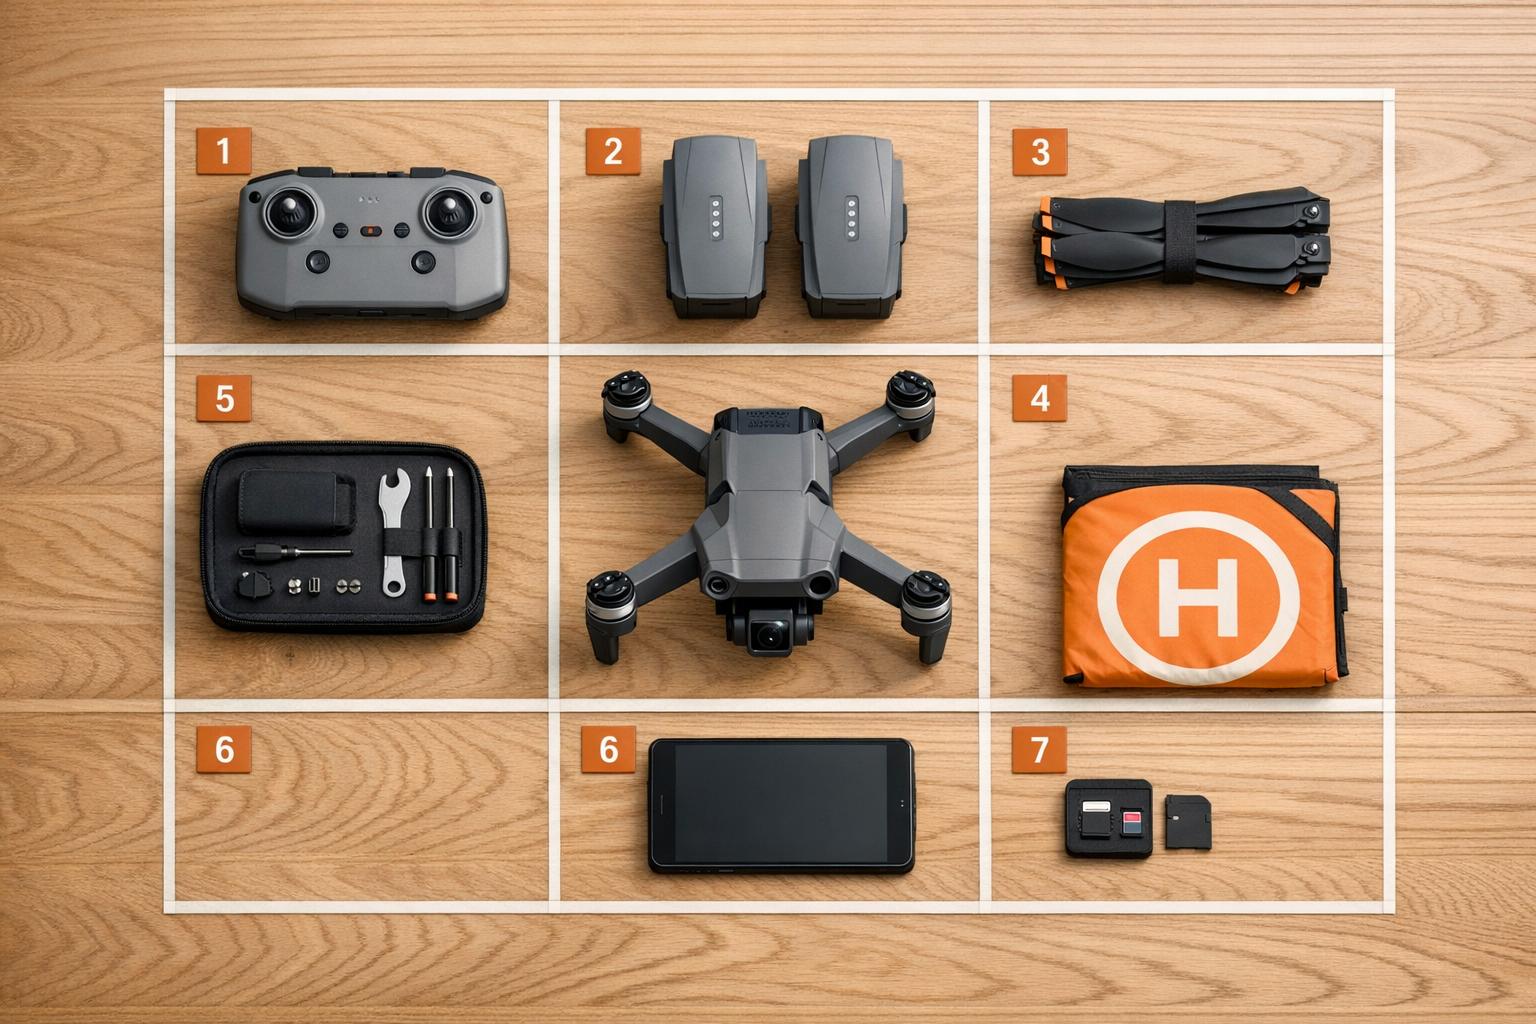
- Structural checks: Inspect airframe, propellers, motors, and landing gear for damage.
- Battery systems: Look for swelling, corrosion, or voltage imbalances. Store batteries properly to avoid degradation.
- Remote controller: Ensure firmware is updated, joysticks move freely, and antennas are positioned correctly.
- Camera and sensors: Clean lenses, calibrate gimbals, and check filters for optimal performance.
- Environment and airspace: Assess weather, obstacles, and secure airspace authorization.
- Final checks: Perform a hover test to confirm everything is functioning properly.
Skipping these steps can lead to expensive consequences, from $500 battery failures to $10,000 compass issues. A 30–45 minute pre-flight routine can prevent up to 90% of equipment-related problems, protect your investment, and ensure safe, reliable operations.

7-Step Drone Pre-Flight Equipment Check Process
Drone Pre-Flight Mastery: Essential Checks for a Safe and Successful Flight
sbb-itb-ac6e058
Step 1: Check Airframe and Structural Components
The physical structure of your drone is the foundation of safe flight. Before every flight, take time to inspect the airframe and its components for any signs of damage that could jeopardize your mission. Start with a thorough visual and physical check of the airframe to ensure it’s free from structural issues.
Inspect Propellers and Motors
Carefully examine each propeller blade for nicks, chips, cracks, or bends. Even minor imperfections can lead to vibrations that affect performance and put unnecessary stress on the airframe. Run your fingers along the edges of the propellers and give each one a gentle tug to confirm they’re securely attached.
"A quick physical tug on each propeller confirms seating. Folding propellers have a habit of feeling locked when they are not." - Jessica May, DroneBundle
Next, check the motor housings for cracks or loose screws. Spin each motor manually to ensure smooth rotation - any grinding noise or resistance could signal an issue. Test for "shaft play" by gently wiggling the motor shaft; it should feel stable with no movement. After powering on the drone, perform a 3–5 second hover at eye level to listen for any unusual noises or vibrations, which could indicate motor imbalance or bearing problems.
Examine the Airframe
Clean the airframe to reveal any hidden structural defects. Inspect the body for cracks, loose screws, or other signs of damage. Focus on high-stress areas like motor mounts and gimbal attachment points, as these spots are prone to wear and tear. Don’t overlook the underside of the drone and landing gear, as repeated landings can cause stress fractures in these areas.
Check for debris lodged in motor spaces or structural gaps - any obstruction could lead to mechanical failure during flight.
Check Gimbal and Landing Gear
Always remove the plastic gimbal clamp before powering on the drone. Leaving it in place can damage the gimbal motors during self-calibration. Move the gimbal through its full range of motion to ensure it operates smoothly and inspect its attachment points for cracks, loose connections, or signs of deformation.
Inspect the landing gear for stability. Look for loose parts, cracks, or stress fractures, and confirm that folding landing gear deploys and locks properly. Since the landing gear supports the drone during takeoff and landing, any weakness here can cause vibrations that interfere with sensor accuracy or overall flight stability.
Once you’ve secured the airframe and confirmed all components are in working order, you’re ready to move on to battery system checks in Step 2.
Step 2: Verify Battery Systems
Once you've ensured the drone's structural integrity, it's time to focus on the battery systems - one of the most frequent sources of failure. In fact, battery-related issues account for about 60% of drone incidents. A careful inspection of your batteries can save you from repair costs that range between $500 and $5,000 and help you avoid unexpected delays. Start by checking for physical damage, such as swelling, puffed cells, or seam separation. Place the battery on a flat surface to test its stability - if it wobbles, gas buildup has likely expanded the casing, making it unsafe to use.
Check Battery Condition
Take a close look at the terminal pins for any signs of corrosion, which could disrupt power flow. Pay attention to alerts from your flight app, such as "Battery Cell Damage", "Cell Deviation", or "Non-Genuine", as these could signal deeper issues. Balanced cell voltages are crucial; if one cell consistently drops by 0.1V compared to the others, the battery pack is no longer safe. Remember, lithium polymer batteries tend to degrade significantly after 200–300 charge cycles.
"Never store your batteries at 100% or 0% for more than 48 hours. Storing at full charge causes internal cell swelling, while leaving them at 0% can lead to a permanent 'brick' that will never charge again." - Drone Doctor LLC
Pay attention to any telemetry data showing a sudden drop in charge - for instance, from 60% to 20%. This indicates high internal resistance, and the battery should be retired. Also, keep in mind that cold weather can reduce battery capacity by 30%–50%. If the temperature is below 50°F (10°C), warm the batteries to room temperature before use.
Inspect Connectors and Locking Mechanisms
Clean the battery contacts and pins using a soft brush or compressed air to remove any carbon buildup. Make sure the connectors engage properly and confirm that the battery clicks securely into the drone’s airframe. After installation, inspect the surrounding airframe for cracks or stress damage that could interfere with the battery’s seating. Give the battery a gentle tug to ensure it’s firmly connected.
Check Remote Controller and Spare Batteries
Verify that your remote controller is fully charged and that the antennas are positioned parallel and upright for the best signal. Turn on the remote controller before powering up the drone to establish a stable connection. For spare batteries, ensure they are charged and stored at 50% to 60% capacity when not in use. If you’re using "Smart" batteries, configure them to auto-discharge to storage levels after two days of inactivity to maintain their cell chemistry. Should a battery fail to power on after extended storage, try holding down the power button for a long press or leave it on the charger for several hours to wake it from hibernation mode.
With your battery systems thoroughly inspected and secured, you’re ready to move on to testing the remote controller and software settings in Step 3.
Step 3: Test Remote Controller and Software Settings
Your remote controller is the key link between you and your drone. Connection issues often arise when the firmware on the controller and drone don’t match, leading to potential disruptions at critical moments. Before turning anything on, check the joysticks to ensure they move freely without sticking. Make sure the antenna is securely attached and positioned correctly for a strong signal. Also, inspect the cable connecting your mobile device to the controller - any faults here can cause unexpected interruptions during your flight.
Test Controller Functions
The correct power sequence is crucial. Start by powering on the remote controller, followed by the drone, and then the mobile device running your flight app. Once everything is on, calibrate the joysticks through the app. Keep an eye on the command link and video feed; weak telemetry may require adjusting the antenna orientation or repositioning the controller.
Once you’ve confirmed the controller is working smoothly, it’s time to dive into the software and firmware settings.
Update Firmware and Configure Settings
Ensure that the firmware on your controller, drone, and mobile app are all compatible. Avoid updating firmware on the day of an important flight, as updates can sometimes introduce unexpected changes that impact performance. If an update is necessary, make sure all devices are charged to at least 80% to avoid power interruptions during installation. After updating, recalibrate the IMU, compass, and gimbal to prevent issues like drift.
Set your Return-to-Home (RTH) altitude to a height that clears the tallest obstacle in your flight area, adding a safety margin - 30 feet above the highest point is a common guideline. Double-check your failsafe settings (whether to land, hover, or return home) to ensure they fit the environment you’re working in. Additionally, confirm that Remote ID messaging is broadcasting properly to comply with regulations. In the flight app, enable "Multiple Flight Mode" and turn off "Beginner Mode" if you’re conducting professional operations.
Once your controller is tested and your software settings are in order, you’ll be ready to move on to preparing your camera, payload, and sensors in Step 4.
Step 4: Prepare Camera, Payload, and Sensors
Your camera and sensors play a key role in ensuring your flight mission goes smoothly.
Check Camera and Lens
Start by cleaning the lens and sensors with a microfiber cloth to eliminate any dust or smudges. Insert your SD card into the drone and format it using the drone's internal settings. This clears outdated data and optimizes the file system for your mission.
Next, double-check your camera settings - resolution, frame rate, and capture mode - through your flight app to ensure they align with your mission requirements. If you're using a thermal payload, remember to switch to "RGB-only" mode when you're not capturing thermal data. Thermal sensors need 5 to 10 minutes to warm up, so power them on early and let them stabilize while you handle other pre-flight tasks.
Calibrate and Install Filters
If prompted, or after traveling long distances, perform a gimbal calibration. Place the drone on level ground, away from potential sources of interference like metal structures, power lines, or large vehicles. For bright conditions, ensure ND filters or any other mission-specific filters are securely attached and free of smudges or dirt.
For advanced sensors like LiDAR or multispectral payloads, confirm their calibration status before heading out. Once everything is calibrated and filters are in place, you’ll be ready to move on to assessing the environment and airspace in Step 5.
Step 5: Assess Environment and Airspace
Getting your drone ready is just one part of the equation. Ensuring the environment and airspace are safe and clear is equally important for a successful flight.
Check Weather and Obstacles
Start by evaluating wind conditions. If gusts are more than 10 mph above the sustained wind speed, it could spell trouble. Most drones, whether consumer or commercial, can handle wind speeds between 15–25 mph. Also, plan your flight path to take advantage of tailwinds on your return leg.
Temperature plays a big role in battery performance. Cold weather (14°F–32°F) can drain battery capacity quickly, while extreme heat (above 95°F) risks triggering thermal shutdowns. For cold conditions, warm your batteries to at least 59°F before takeoff. You can use insulated cases or even your body heat to achieve this. Always check the forecast for your flight window, allowing for some buffer time in case of unexpected changes. And remember, moisture is a no-go: rain, snow, and fog can damage your drone’s electronics immediately or cause corrosion over time.
Walk the site before launching to identify hidden obstacles like power lines or temporary structures. It’s best to launch from a spot well away from power lines and buildings to avoid interference with your drone’s compass. Set your Return-to-Home (RTH) altitude to clear the tallest obstacle in the area by at least 30 meters.
Verify Airspace Authorization
Once you’ve assessed weather and obstacles, it’s time to ensure the airspace is clear. Use an FAA-approved app like Aloft, AirMap, or DJI Fly to submit a LAANC (Low Altitude Authorization and Notification Capability) request if you’re flying in controlled airspace. The good news? Most LAANC requests are approved in under a minute. However, if the UAS Facility Map for your location shows "0 ft", you’ll need to apply manually via FAADroneZone, which can take up to 90 days.
Keep a screenshot of your LAANC authorization handy - this can be useful if law enforcement or FAA inspectors ask for proof, especially in areas with poor cell service. On the day of your flight, check for Temporary Flight Restrictions (TFRs), which can pop up unexpectedly for events like VIP visits or sports games. These restrictions take precedence over any prior approvals. Also, review NOTAMs (Notices to Air Missions) for temporary hazards like construction cranes. Lastly, confirm that your drone’s Remote ID broadcast is active, as enforcement will be fully in place by 2026.
Once you’ve verified the environment and airspace, you’re ready to activate your systems and move on to the final checks.
Step 6: Activate Systems and Perform Final Checks
With your environment and airspace confirmed, the next step is to power up your equipment and complete the final safety checks before takeoff.
Power On Systems
Turn on your devices in the following order: remote controller, aircraft, and then mobile device. If you reverse this sequence, you might encounter connection or binding issues. Also, make sure to remove the gimbal cover before powering up to prevent motor damage during the self-diagnostic rotation.
Once everything is powered on, wait for the GPS to lock onto the necessary satellites. Regular operations typically need 6–8 satellites, but if you're using a high-precision RTK setup, aim for 10–12 satellites. This step ensures the system is fully ready for flight. Double-check that your home point is correctly set to your takeoff location, and verify that your Return-to-Home (RTH) altitude aligns with safety guidelines. For the best signal, position the controller antennas parallel and pointing upward. Lastly, confirm that the Remote ID feature is active.
After these steps, you're ready to perform a quick hover test to confirm everything is functioning as it should.
Perform Initial Hover Test
Now, conduct a hover test by lifting the drone to eye level, approximately 3–6 feet, and holding it steady for 3–5 seconds. This brief test is crucial for spotting any issues early. While hovering, pay attention to any unusual sounds, vibrations, or irregularities in control responsiveness. Also, ensure the video feed is clear and telemetry readings are accurate.
"A 3–5 second hover at 1–2 meters verifies control response, video feed, telemetry, and motor symmetry. If anything feels off, land and diagnose before climbing." – DroneBundle Blog
If you notice any problems during the hover, land immediately and troubleshoot. Before moving forward, do a final 360-degree scan of your takeoff area to ensure no new obstacles or people have appeared. Studies show that around 60% of drone incidents are due to equipment failures, while 30% are caused by human error. Nearly 90% of these issues can be caught during pre-flight checks. This hover test serves as your last opportunity to identify and address potential problems before taking to the skies. By completing this step, you ensure that your equipment and surroundings are fully prepared for a safe flight.
Step 7: Inspect and Maintain Equipment After Flight
After landing, take about 10–15 minutes to carry out a detailed post-flight inspection. This step is essential for identifying potential issues early and avoiding expensive repairs down the line.
Complete Post-Landing Checks
Once the flight is complete, follow a systematic approach to ensure your equipment stays in good shape. Begin by shutting down the system in the proper order: first the aircraft, then the remote controller. Afterward, check the motors for heat - excessive warmth could signal unusual wear. As the motors cool, visually inspect the airframe for cracks, loose screws, or debris that may have accumulated during the flight.
Next, remove the SD card and back up your footage or data in two separate locations before reformatting the card. This ensures your files are safe and ready for future use. Allow batteries to cool to room temperature before recharging or transporting them. If you won’t be flying again for at least two weeks, store the batteries at 40–60% charge to extend their lifespan. Properly cared-for lithium polymer batteries typically last for 150–250 cycles.
Don’t forget to update your flight log. Include details like flight duration, location, pilot name, and the aircraft used. Be sure to document any irregularities, such as GPS errors, adverse weather conditions, or bird interference. These notes not only help identify components that might need attention but are also valuable for insurance purposes or certification renewals. Keeping accurate logs and backing up data promptly supports better performance over time.
Clean and Maintain Components
After each flight, cleaning and maintenance are critical to avoid long-term problems. Carefully inspect the propellers for any signs of damage, like nicks, chips, or warping, which can lead to harmful vibrations and stress on the airframe. Use a soft brush or compressed air to clean dust off vision sensors. For camera lenses, a microfiber cloth and lens cleaning solution will keep them in top condition.
Check motor mounting screws every 20–30 flight hours and tighten them with medium-strength threadlocker if needed. Store your drone in a padded, hard-shell case with the gimbal lock engaged, and include silica gel packets to keep moisture at bay. Replace any batteries that show swelling or have a health rating below 80% as indicated by their software. These precautions can prevent an average of two serious incidents per year for commercial operators.
Conclusion
Pre-flight equipment checks are not just a formality - they are essential for ensuring safe and professional drone operations. Did you know that 60% of drone-related incidents are caused by equipment failures, and 30% stem from human error? The good news is that sticking to proper pre-flight procedures can prevent up to 90% of equipment-related issues. That’s a huge payoff for the 30–45 minutes spent on thorough checks before every mission.
But safety isn’t the only benefit. Regular checks also protect your investment. For commercial operators flying three times a week, maintaining a disciplined checklist can prevent an average of two incidents per year. Fewer incidents mean safer missions, happier clients, and less wear and tear on your gear.
New technology is also making it easier than ever to stay compliant. Integrated digital platforms now connect pre-flight checks to flight logs and maintenance records, cutting audit prep time from weeks to minutes. Tools like those from Anvil Labs simplify compliance and asset management, helping operators focus on safe and efficient flights.
Looking ahead, with Remote ID requirements fully enforced by 2026 and regulations for BVLOS (Beyond Visual Line of Sight) operations evolving, automated systems for regulatory compliance will become even more critical. To stay ahead, make pre-flight checks a standard part of your workflow. Include them in your client estimates, use airframe-specific checklists, and treat every takeoff as a fresh start that requires careful verification. By committing to these practices, you’ll enhance operational safety, earn client trust, and protect your equipment and certifications. It’s a win-win for everyone involved.
FAQs
How do I know when a drone battery is no longer safe to fly?
A drone battery becomes unsafe to use if it shows signs of swelling, bulging, or any physical damage, as these issues can create serious safety hazards. Another red flag is a noticeable decrease in flight time or inconsistent power delivery during operation, which signals that the battery's capacity has diminished. Make it a habit to inspect your battery regularly for swelling and keep an eye on its performance to know when it's time for a replacement.
What should I do if the drone shows compass or IMU warnings before takeoff?
If your drone shows compass or IMU warnings before takeoff, it’s a sign you need to calibrate these sensors for a safe flight. Compass calibration is especially important after crashes, traveling long distances, or noticing strange flight behavior. For IMU calibration, place the drone on a stable, level surface and follow the steps outlined in the manufacturer’s guide. Recalibrating regularly - particularly after impacts, firmware updates, or moving to a new location - helps keep your sensors accurate and reduces the risk of future warnings.
What’s the fastest way to confirm I’m authorized to fly in my airspace?
The fastest way to confirm airspace authorization is by securing real-time approvals through LAANC (Low Altitude Authorization and Notification Capability) or using FAA-approved waivers for restricted zones. Always double-check for any extra requirements that might apply to your specific location before taking off.
